If you’ve ever stared at a login screen not knowing which button to click, you’re not alone. Every school year, thousands of students, parents, and even teachers search for help with the pear assessment student login — and most of what they find is either an unhelpful login form, a guide that only works for one specific school district, or a vague blog post that never actually tells you what to do.
This guide fixes all of that. Whether you’re a sixth grader logging in for the very first time, a high schooler who just switched schools and can’t get back in, or a parent trying to help your child access their first benchmark exam, this article walks you through every single method step by step. We cover direct login, Google SSO, Clever SSO, Microsoft login, Chromebook Kiosk mode, mobile devices, first-time class enrollment, password resets, and a full table of common errors with fixes.
Bookmark this page. You’ll want to come back to it.
What Is Pear Assessment? (And Why Is the Login Confusing?)
Before diving into the pear assessment student login process, it helps to understand what the platform actually is — especially because many students and parents are confused by the name change.
Pear Assessment was previously called Edulastic. If you’ve seen “edulastic.com” in your browser history or heard your teacher mention Edulastic, that’s the same platform. In 2022, Edulastic was rebranded to Pear Assessment after being acquired by Pear Deck Learning, which is now part of GoGuardian. The old app.edulastic.com URL still works and redirects to the new platform, but the official home is now assessment.peardeck.com.
The reason the login feels confusing is that Pear Assessment supports multiple ways to sign in, and which one you use depends entirely on how your school or district has set things up. Some schools use Google accounts. Others use Clever. Some use Microsoft. A few still use a direct username and password. And on test day, you might be logging in through a locked-down Kiosk app on a Chromebook.
There is no single “correct” login method — there are six. This guide covers all of them.
The Direct Login URL — Where to Start
The first thing any student needs to know is the actual URL. Go directly to:
Bookmark this. Save it. Write it on a sticky note if you have to. This is the real login page, and navigating here directly saves a lot of confusion.
On this page you will see several options:
- Log in with Google
- Log in with Microsoft
- Log in with Clever
- Enter username / email and password manually
If your school uses SSO (Single Sign-On) — which most US schools do in 2025–2026 — you will almost never need to type a username and password manually. SSO means your school’s IT department has connected Pear Assessment to your existing school account, so you just tap one button and you’re in.
The question most students have is: which button do I click? The section below answers that. endbugflow, Feed by way, connecting to wifi, viral manners, networth.
Which Login Method Does My School Use?
This is the most important question, and no other guide answers it directly. Here’s how to figure it out in 30 seconds:
Does your school use Google Workspace (Google Classroom, Gmail, Google Drive for school)? → Click “Log in with Google” and select your school email account (it ends in your school’s domain, not @gmail.com). Uae peak, thehometrotters, meetshaxs, beaconsoft, uhoebeans, aliensync, programgeeks, avstarnews.
Does your school use Microsoft 365, Outlook, or Teams? → Click “Log in with Microsoft” and use your school’s Office 365 account.
Does your school use a Clever portal or a school app dashboard? → Use the Clever login method (explained in detail below).
Does your teacher give you a separate username and password for Pear Assessment? → Type those directly into the username and password fields.
Still not sure? Ask your teacher or look for a “Tech Help” or “Student Portal” page on your school’s website. Your school’s IT department will have published the login method somewhere.
Method 1: Log In with Google
This is the most common login method for US K–12 students. Here’s exactly how it works:
Step 1: Go to https://assessment.peardeck.com/login
Step 2: Click the “Sign in with Google” button.
Step 3: A Google account picker will appear. Make sure you select your school email — NOT your personal Gmail account. Your school email usually looks like firstname.lastname@schooldistrict.org or studentID@schoolname.edu.
Step 4: If prompted, enter your school Google password and complete any two-factor authentication your school requires.
Step 5: You will be redirected to your Pear Assessment student dashboard, where all your assigned tests and assignments will appear.
Common mistake: Students who are already logged into personal Gmail on their browser sometimes end up in the wrong account. If this happens, open an Incognito window (Ctrl+Shift+N on Chrome) and try again, or sign out of personal Gmail first.
Method 2: Log In with Clever
Clever is a single sign-on portal used by thousands of US school districts. If your school uses Clever, the pear assessment student login process goes through Clever first, then forwards you to Pear Assessment automatically.
Step 1: Go to clever.com/in/[yourdistrict]. Your district’s specific Clever URL should be on your school’s website or printed on any handout from your IT department. For example, Denver School of Science and Technology students go to clever.com/in/dsst.
Step 2: On the Clever login page, click “Log in with Active Directory” (or “Log in with Google” if your district uses that method — look for whatever option your school specifies).
Critical warning: Do NOT click “Log in with Clever” on the username/password screen. If you click that button and try to type your school credentials, you will get an “Invalid username or password” error — even if your password is correct. Clever login is handled through your school’s Active Directory or Google account, not a standalone Clever username.
Step 3: Once you’re inside the Clever portal, look for the Pear Assessment icon in your app grid and click it. You will be taken directly to your Pear Assessment dashboard without needing to log in again.
If you’ve already logged into Clever today: You don’t need to go back to clever.com. Just go directly to assessment.peardeck.com/login and click “Log in with Clever.” Since your Clever session is already active, it will recognize you instantly.
Method 3: Log In with Microsoft (Office 365)
For schools that use Microsoft Teams, Outlook, or OneDrive as their main tools, the Microsoft SSO option is the right choice.
Step 1: Go to https://assessment.peardeck.com/login
Step 2: Click “Sign in with Microsoft”.
Step 3: Enter your school Microsoft 365 email address (usually firstname@schooldomain.edu) and your school password.
Step 4: If your school uses Azure AD Multi-Factor Authentication, approve the sign-in prompt on your phone or authenticator app.
Step 5: You’ll land on your Pear Assessment dashboard.
Microsoft SSO is particularly common in middle schools and high schools that have adopted the Microsoft 365 for Education suite at the district level.
Method 4: Log In with Direct Username and Password
Some teachers — especially in smaller schools or for individual class-level accounts — issue students a direct Pear Assessment username and password rather than using SSO.
Step 1: Go to https://assessment.peardeck.com/login
Step 2: In the Username or Email field, type the email address or username your teacher gave you.
Step 3: In the Password field, type your password. Passwords are case-sensitive — make sure Caps Lock is off.
Step 4: Click Sign In.
If you’ve never logged in before and your teacher just gave you a temporary password, you may be prompted to create a new one on first login. Choose something you’ll remember.
Method 5: Logging In on a Chromebook (Kiosk Mode)
This is one of the most overlooked parts of the pear assessment student login experience, and it causes a lot of confusion on test days. Kiosk Mode is a secure testing environment that locks the Chromebook into a single app so students can’t open other browser tabs or applications during a high-stakes exam.
Here’s the key thing students get wrong: you do NOT sign into the Chromebook first when using Kiosk Mode. Normal Chromebook login is skipped entirely.
Step 1: Turn on the Chromebook or reach the Chromebook login screen (the screen where it normally asks for your school Google account).
Step 2: Instead of signing into Chrome, click the Apps button at the bottom left of the login screen.
Step 3: Find and click the Pear Assessment icon in the app list.
Step 4: The Chromebook will launch the Pear Assessment Kiosk App in full-screen, locked mode.
Step 5: Enter the test session code or log in with your school credentials as prompted inside the Kiosk app.
If you see a “Kiosk Mode Error”: This usually means your LDAP or network password needs to be updated. Contact your school’s IT help desk — this is not something you can fix yourself. It typically requires an IT admin to update your password in the school’s directory (called Webdesk in some districts).
If you see a pop-up saying you must be in full-screen mode: Your teacher has enabled the “Restrict Navigation” anti-cheat setting. You must stay on the test screen at all times. Navigating away for more than 5 seconds will trigger a warning, and if you exceed the allowed number of warnings, your test will be paused and your teacher will need to manually resume it.
Note: Kiosk Mode is NOT compatible with iPads. iPad users need to use the standard browser-based login methods described above.
Method 6: Logging In on a Mobile Device (iPhone, Android, iPad)
Mobile login for the pear assessment student login works through the browser — there is no separate standalone Pear Assessment student app required for most assignments.
Step 1: Open Safari (iPhone/iPad) or Chrome (Android).
Step 2: Go to https://assessment.peardeck.com/login
Step 3: Use your school’s preferred login method (Google, Microsoft, Clever, or direct username/password) — the same as on a desktop.
Step 4: The Pear Assessment interface will load in a mobile-optimized view. You’ll see your assignments and can begin taking tests directly in the browser.
Tips for mobile users:
- Use landscape mode (rotate your phone sideways) for a better view on longer reading passages or complex math questions.
- If your test includes drag-and-drop questions, they work via touch — tap and hold, then drag.
- Some technology-enhanced question types (like graphing) work better on a tablet than a phone. If you’re struggling on a small screen, ask your teacher if you can switch to a laptop.
- Do not use the browser’s “back” button during a test — this can exit the test or cause errors. Use only the on-screen navigation arrows.
First Time Login: Joining a Class with a Class Code
If you’re new to Pear Assessment and you’ve just logged in for the very first time, you might see an empty dashboard with no assignments. This is normal — you just need to join your teacher’s class first.
Your teacher will give you a class code — a short alphanumeric code that looks something like AB12CD. Here’s how to use it:
Step 1: Once logged in, look for a button or link that says “Join Class” on your dashboard.
Step 2: Enter the class code your teacher provided and click Join.
Step 3: Your class will appear in your dashboard, and any assigned tests or practice assignments will now show up.
If your school uses Clever or Google Classroom roster sync, you may not need a class code at all — your teacher can sync class rosters automatically and you’ll already be enrolled the moment you log in. Check with your teacher if you’re unsure.
Forgot Your Password? Step-by-Step Reset
Password issues are one of the top reasons students struggle with the pear assessment student login. Here’s how to handle it:
If your school uses SSO (Google, Microsoft, Clever): Your Pear Assessment login is tied to your school account. You don’t have a separate Pear Assessment password to reset. Instead, you need to reset your school account password through your school’s IT portal. Check your school’s student tech support page, or ask a teacher or IT staff member.
If you have a direct Pear Assessment username and password:
Step 1: Go to https://assessment.peardeck.com/login
Step 2: Click “Forgot Password?” below the login fields.
Step 3: Enter the email address associated with your Pear Assessment account.
Step 4: Check your email inbox for a password reset link. If you don’t see it within 5 minutes, check your spam/junk folder.
Step 5: Click the link in the email and follow the prompts to create a new password.
Step 6: Return to the login page and sign in with your new password.
Common Login Errors and How to Fix Them
Here is a complete troubleshooting reference for the most common problems students face with the pear assessment student login:
| Error Message | Most Likely Cause | Fix |
|---|---|---|
| “Invalid username or password” | Wrong login method (e.g., typed credentials into Clever screen) | Use Google or Active Directory SSO instead of typing manually |
| “Kiosk mode error” | LDAP/network password expired or needs update | Contact school IT to update password in Webdesk |
| “You must be in full-screen mode” | Anti-cheat setting enabled by teacher | Press F11 or the full-screen button; stay on the test tab |
| Blank white screen after login | Browser cache conflict | Clear cookies and cache (Settings → Privacy → Clear browsing data), then try again |
| “Account not found” | Logged in with wrong email | Sign out and log back in with your school email, not a personal account |
| Dashboard shows no assignments | Not enrolled in class yet | Ask teacher for class code and use “Join Class” |
| Google account picker shows wrong account | Multiple Google accounts saved | Open Incognito window and log in with school account only |
| Test paused mid-exam | Navigated away too many times (anti-cheat) | Tell your teacher — they need to manually resume from the Live Class Board |
| “Session expired” | Left the test idle too long | Log back in and contact teacher — they can see your progress and may be able to restore it |
| Page not loading on mobile | Browser incompatibility | Switch to Chrome on Android or Safari on iPhone/iPad |
What You’ll See After Logging In: Your Student Dashboard
Once the pear assessment student login is complete and you land on your dashboard, here’s what to expect:
Assignments tab: This shows all tests, quizzes, and practice assessments your teacher has assigned to you. Each card shows the assignment name, the subject, the due date, and its status (not started, in progress, submitted, or graded).
Reports/Grades tab: After your teacher releases scores, you can view your results here. Some teachers share detailed feedback including which standards you mastered and which need more practice.
Classes: If you’re enrolled in multiple classes (e.g., different subjects or periods), each will appear separately and you can switch between them.
Score view (if enabled by teacher): For formative assessments, teachers can allow students to see instant feedback right after submission. For high-stakes tests like benchmarks or finals, teachers may wait to release scores.
The student dashboard is intentionally simple compared to the teacher dashboard — your job is just to find your assigned test and start it.
Pear Assessment vs. Pear Deck: What’s the Difference?
A lot of students and parents get confused between Pear Assessment and Pear Deck because they’re both products from Pear Deck Learning. They are NOT the same tool.
Pear Assessment (formerly Edulastic) is an assessment platform — it’s used for quizzes, tests, benchmarks, and standardized test practice. It has a formal login process, grade tracking, and detailed reporting for teachers.
Pear Deck is an interactive presentation tool — teachers use it to add interactive slides to their lessons, and students join a session using a 5-letter join code (usually displayed on the classroom projector). Pear Deck sessions often don’t require a login at all — you just go to joinpd.com and enter the code.
If your teacher says “join my Pear Deck,” you go to joinpd.com. If your teacher says “log into Pear Assessment for today’s quiz,” you go to assessment.peardeck.com/login. Different URLs, different products.
Tips for a Smooth Test Day
Now that you know how the pear assessment student login works, here are practical tips to make sure test day goes smoothly:
Log in before the test, not during. Don’t wait for your teacher to say “start the test” before you’ve even opened the login page. Open your browser and sign in as soon as you sit down.
Use the right browser. Chrome is the most reliable browser for Pear Assessment. Firefox and Edge also work. Safari works on iPhone/iPad. Avoid older browsers or unusual ones.
Close other tabs. If your teacher has enabled the anti-cheat “Restrict Navigation” setting, navigating away from the test — even accidentally — triggers a warning. Close everything else before starting.
Don’t use the browser back button. During a test, use only the on-screen navigation. The browser’s back button can cause questions to reset or the test to exit.
Check your internet connection. Pear Assessment requires a stable internet connection. If you’re on school Wi-Fi and it’s a heavy-traffic day (everyone is testing at once), move closer to a Wi-Fi access point if possible.
Take a screenshot of your login screen if something breaks. If you get an error mid-test, screenshot it immediately. This helps your teacher and IT staff diagnose exactly what went wrong.
For Parents: Monitoring Your Child’s Progress
Parents often search for the pear assessment login hoping to track their child’s performance. Here’s what you should know:
Pear Assessment is primarily designed for students and teachers. There is no dedicated parent portal for Pear Assessment the way some other school platforms have. However, here’s what you can do:
Ask your child to show you their dashboard. After your child logs in, the Reports or Grades tab shows completed assessments and scores (if released by the teacher).
Communicate with the teacher. Teachers can export reports and share them via email or through your school’s main parent communication platform (like ParentVue, Infinite Campus, or Schoology).
Check your school’s LMS. If your school uses Google Classroom, Canvas, or Schoology, completed Pear Assessment assignments sometimes push grades back to those platforms automatically, where you can view them through your parent account.
Frequently Asked Questions
Q: What is the Pear Assessment student login URL? A: Go to https://assessment.peardeck.com/login. You can also still use app.edulastic.com — it redirects to the same place.
Q: Can I log into Pear Assessment on my phone? A: Yes. Open Chrome (Android) or Safari (iOS), go to the login URL, and use your school’s login method. Most question types are fully functional on mobile browsers.
Q: Why does my dashboard show no assignments after I log in? A: You haven’t joined your teacher’s class yet. Ask your teacher for the class code and click “Join Class” on your dashboard.
Q: I clicked “Log in with Clever” and typed my password but it says “Invalid username or password.” What do I do? A: This is a very common mistake. On the Clever screen, you should NOT enter a username and password. Click “Log in with Active Directory” (or “Log in with Google” if your school uses that) instead. You should never need to type credentials on the Clever login screen.
Q: Does Pear Assessment work on iPads? A: Yes for regular testing through the browser. However, the Kiosk Mode (secure testing app) is NOT compatible with iPads. If your class is using Kiosk Mode for a secure exam, you will need a Chromebook or Windows device.
Q: What was Pear Assessment called before? A: It was called Edulastic. If you see references to Edulastic in older materials, it’s the same platform. The official rebrand to Pear Assessment happened after GoGuardian/Pear Deck Learning acquired it.
Q: My test got paused in the middle. What do I do? A: This usually happens when the anti-cheat setting detected that you navigated away from the test too many times. You cannot unpause it yourself — your teacher needs to manually resume your test from the Live Class Board. Tell your teacher immediately.
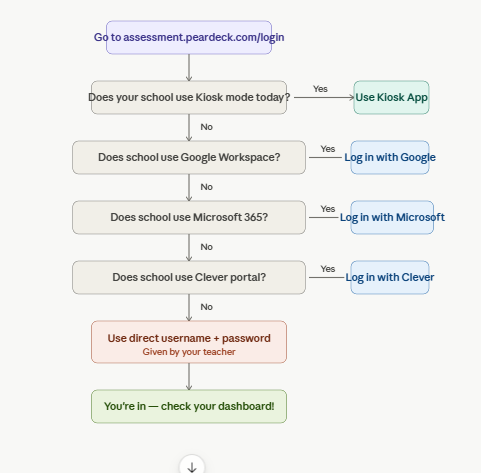
Quick Reference: Login Decision Flowchart
Here is a visual guide to help you quickly identify which login method applies to you:—
Summary
The pear assessment student login is not a single process — it’s a family of six different methods depending on your school’s technology setup. Here’s the quick recap:
The login URL is assessment.peardeck.com/login (or app.edulastic.com, which redirects to the same place). Most US schools use either Google SSO, Clever SSO, or Microsoft SSO — meaning you tap one button and your school account handles the rest. If you’re on a Chromebook for a high-stakes exam, you use the Kiosk App and skip the normal Chromebook login entirely. Mobile devices use the standard browser login. First-time users need to join their class with a code from their teacher.
When something goes wrong, the most common culprits are: using the wrong login method, being in the wrong Google account, a Clever password error caused by typing credentials instead of using SSO, or the anti-cheat system pausing your test. All of these are fixable — most in under two minutes with the right guidance.
Understanding how the pear assessment student login works before test day means one less thing to stress about when it matters most. Log in, find your assignment, and focus on what you actually came to do: demonstrate what you know.